Open Water Series: Primer

First steps on the beach

Guest post by Coach Nate

So you’ve decided to take the plunge and jump into open water! Welcome to a hobby that will bring joy to every summer for the rest of your life (or all year round, for those people who live in warmer climates). When I’m swimming in open water, it’s a spiritual experience. It’s also excellent exercise, a fine counterpoint to high intensity impact training.

You probably have some trepidation though: isn’t it dangerous to be swimming in open water? Won’t sharks get you? Isn’t it cold? What if I get tired and freak out and can’t swim into shore? Riptides? Jellyfish?  It doesn’t have to be scary – let’s go over a few of the basics.

Where should I swim?

The first thing to do is to find a venue. When searching for places to swim, first look for a group to swim with. There are many groups out there doing OW (open water) “practices” from the CIBBOWS that swim at Brighton Beach, to the Knuckleheads in Boston, to the Santa Barbara Nite Moves. It’s a great idea to swim with a pack when you start off, as you’ll have less fear with a group and you’ll be learning from those who are more experienced.  It is IMPORTANT that you find someone to swim with you. Never swim alone.

Next, try to pick a long beach that you can swim parallel to (this makes it easier to get out early if you feel the need).

Water Temperature

Now, let’s talk about water temperature. If you’re a pool swimmer (or you live in Hawaii) you’re used to 78F (that’s 26C for you metric folk). Most swimming venues won’t be that temperature. Brighton Beach, for example, will only get up into the 70s sometime around late August. The water will feel cooler than expected. Examine water temps before you swim and scale your swim accordingly. Again, you can google for water temps pretty easily (http://www.noaa.gov/).

If entering cold water for the first time, enter in slowly and allow a couple seconds to acclimate.   Start by dipping your toes into the water (like you do before you jump into the pool). Acclimating to a water temp takes time, and the time you already spent in the water is good experience in itself. Since we’re just starting out, find a time when the weather is warm/hot which means a warmer water temperature.

Wildlife

Now, about that wildlife – don’t worry about it too much.  That’s not to say you won’t encounter any sort of creature.  Heck, that’s half the fun of open water swimming!  For the most part we’ll be swimming close enough to the shore that you won’t see too many sea creatures around.  However, as our comfort with the experience of swimming in open water we’ll venture further out and explore the water and that’s where you should be cautious.  Again, since we’re just starting out and swimming with a group closer to shore everyone should be fine.

I am giving you all the cautious notes first, but really you will find that being in the open water is one of the freest experiences you can imagine. No better time than the present to get out there and swim!  So, with that said…

Let’s #GetHiitOn!

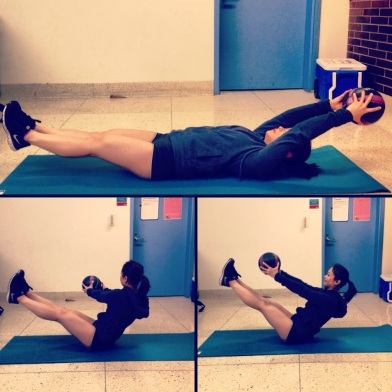
Ab Series: V-UPS

V-ups strengthen and target the rectus abdominis (abs) through a wide range of motion, it is good for freestylers and backstrokers trying to improve the speed of flip-turns. Oh yeah, they are also very challenging!

Primary: Rectus abdominis (abs)
Secondary: Serratus anterior (wings),  external oblique (obliques), rectus femoris (quads)

Image

For an extra challenge:

  1. Regular V-up, hold the position
  2. Hold the V-up, twist to the right with the medicine ball, try to hold the pose
  3. Return to the center, twist to the left with the medicine ball

Image

If you feel it in your hips (hip flexors) try the exercise with just body weight until you are comfortable working your way toward a medicine ball.

Look at her abs!

Look at her abs!

Let’s #GetHiitOn!

Ab Series: I’m planking on a million!

Now that you know what it feels like to engage your core after the hold exercise, we would like to introduce planks!

Planks are great all-around exercise to learn how to engaged the abdominal muscles in a way that will carry over to maintain proper hip and low back position during all four strokes, as well as streamlining off the starts and turns.

starts

Primary: Rectus abdominis (abs), external oblique (obliques by the hips),  internal oblique (underneath the external) Secondary: Serratus anterior (wings), rectus femoris (anterior thigh), gluteus maximus (buttocks), gluteus medius (hip abductor), biceps femoris (hamstring), semitendinosus (hamstring) , semimembranosus (hamstring).

Image

  1. Start with face down with your knees on the floor and both forearms on the floor, squeeze and hold your stomach in, preventing it from hanging.
  2. Raise your knees off the floor to support your body weight on your toes and forearms.
  3. Maintain the head position.

If you are feeling strong, rotate your body perpendicular to the floor left or right, hold for 15 seconds. Switch to the opposite side, hold for another 15 seconds.

If regular planks are challenging, you can stagger or put your leg down during the side planks, like so:


Tips:

  1. The body position should be straight held in a straight line from ankles to the head.
  2. If the head is out of alignment with the rest of the body, the exercise becomes harder.
  3. Just don’t forget to “Suck in Your Belly”.

Here’s an example of plank set:

  1. Regular forearm plank hold for 30 seconds
  2. Right forearm side plank hold for 30 seconds
  3. Left forearm side plank hold for 30 seconds
  4. 30 seconds rest in Child’s pose.

Repeat this set 3-4 times depending on how you feel.

Let’s #GetHiitOn

Ab Series: “Suck in your belly”

How many times have you heard “engage your core”? I know, it’s not easy, but it is a small detail that makes the difference.

Correct technique begins with the conscious recruitment of the abdominal muscles- aka feel your abs burn and body shake; good technique translates into effective and efficient training. After-all, who wants to do the same thing over and over again without achieving maximum efficacy? This is part of the reason why some people can do over 100 reps of ab exercise a day and not see or get results.

Here is a very elementary but ABSolutely necessary exercise to help us learn about our own individual core: how to consciously use it, how it is supposed to feel when it is engaged, and to remember that we need to use it.

The Hollow Hold

Why it matters

  • To learn how to use your abdominal muscles to position the hips for correct technique and to stabilize the lower back
  • Helps build a tighter streamline

  • Reduces injury
  • Helps with the initiation of the trunk flexion during freestyle and backstroke turns

Muscles involved:

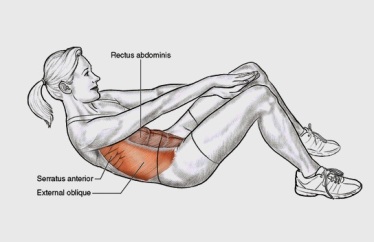
Primary: Rectus abdominis
Secondary: External and external oblique, transversus abdominis, and serratus anteriorphoto

  1. Lie on your back
  2. Bend knees with feet on the floor
  3. Scoop the belly in and tighten  your core, make sure your lower back is touching the floor
  4. Lift your shoulders 6 inches (15 cm) off the ground, keep the low back in a stable and fixed position
  5. Look down at your arms past your knees to recruit the upper fibers of the rectus abdominis
  6. Reach the arms towards the tops of your knees
  7. Contract and relax 20 times

*If there is space in your lower back, then you have fallen out of position*

Feeling strong? Hold for 60 seconds or until you get tired, repeat for three sets.
Feeling invincible? Perform the exercise with legs off the ground!

Let’s #GetHiitOn

Abs Series: Introduction

Welcome to our ab series! We will work on progression towards more advanced abdominal exercises.  Stay tuned!

In land sports, the athlete has the support of a stable surface, swimmers do not have a solid surface to support their weight, swimmers need to create their own base of support with their core. The core is the foundation on which the muscles of the upper and lower body are built. When the body is engaged in swimming, muscles either function as a mover or a stabilizer of a body segment.  The core serves as a stabilizer as well as a key connecting component for a coordinated movement of the arms and legs.

Abs on abs on abs

Abs on abs on abs

The abdominal muscles assist with the body-rolling movements in backstroke, freestyle, butterfly, backstroke and underwater dolphin kick. Maintaining strong core muscles help protect against back injury. (Swimmers who swim the butterfly stroke are more susceptible to lower back pain.)

Let’s take a deeper dive into our abs.  How about very brief anatomy lesson?

WARNING: INFORMATIVE AWARENESS AHEAD

Screen Shot 2014-04-25 at 11.37.18 AM

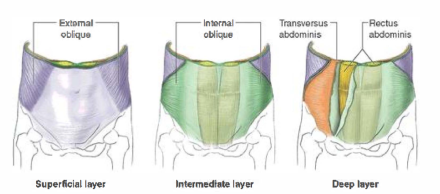
The abdominal wall is made of four paired muscles that extend from the rib cage to the pelvis. In Pilates, these muscles are part of the “Powerhouse”.  Powerhouse muscles work together to form a supportive corset for your trunk. They stabilize but also create the big moves we make.

These muscles can are divided into two groups:

Single Anterior group: contains one paired muscle:

  •  Rectus abdominis (“six pack”) divided into left and right by the mid-line of body

Lateral groups: contains a side of the three remaining paired muscles

  • External oblique (most superficial layer)
  • Internal oblique
  • Transverse abdominis

There are a million ways to work on your abs.  In this series we’ll highlight a few exercises to help build a stronger core and help stabilize your swimming.  Are you ready?

Let’s #GetHiitOn!

30-60-90 Part II – Level up for Summer

30-60-90 Part II – Get ready for a challenging workout!

Focus: Core

No rest means NO REST in between the intervals.

Warm up
Time
 

Exercise
1 min Stretch: Forward lunge twist, alternating right and left, hold 10 seconds.
1 min Stretch: Forward lunge step right foot outside right hand, alt with left foot outside left hand, hold 10 seconds.
1 min Russian Twists with medicine ball
1 min Side lunges, alternating left and right
1 min Squats
1 min Jumping Jacks
1 min Mountain Climbers
1 min Forward lunge
1 min Forward plyo lunge


Main Set – Round 1
Time
 

Exercise
30 secs Jacks
30 secs V-Ups
60 secs Squat Jump
60 secs Crunches – balancing medicine ball on shins
90 secs Burpee
90 secs Reverse crunch squeezing medicine ball between knees

30 secs rest

Round 2
Time
 

Exercise
30 secs Burpee with squat jumps
30 secs V-ups with medicine ball
60 secs Skaters balancing on one foot, with medicine ball in hand
60 secs Bridge – slowly bringing hips up and down
90 secs Burpee with push-up and squat jump
90 secs Reverse crunch with medicine ball between knees
60 secs Cardio Finisher 1: Plyo lunges
60 secs Cardio Finisher 2: Mountain climbers

Finish the workout with a light jog followed by your own stretching session.  Let’s get changed and hit the pool!

Pool Workout

We’re going to go for endurance and speed! I would bring my water bottle and gels for this workout.

# Distance Stroke Interval Notes
1 500 swim
1 300 kick
1 300 pull
8 75 kick, drill swim 0:01:30
5 200 Swim 0:03:00 Smooth
1 50 Easy
5 100 Free, pull, active recovery 1:50:00 pull
5 100 Free-sprint, use legs! 1:35:00 Fast
1 100 Easy
10 50 Kick 1:15:00 Fast
1 50 Easy
4 100 Broken 100s 5 seconds rest in between each 25 Race pace
8 25 Half underwater, half free sprint 0:50:00 Sprint 2nd half of pool
1 200 Cool down
Total Distance Total Time
5200 Variable

Let’s #GetHiitOn!

30-60-90 Dryland: Abs focus

Quick HIIT Workout

30-60-90 Dryland

Focus: Core

Warm up
Time
 

Exercise
1 min Jog in place
1 min Forward lunge
1 min Side lunges, alternating left and right
1 min Squats
1 min Jumping Jacks
1 min Sumo Jacks
1 min Mountain Climbers
1 min Skaters
1 min Tricep Pushups


Main Set – Round 1
Time
 

Exercise
30 secs High Knees
30 secs Plank
60 secs Squat Jump
60 secs Alternating side plank
90 secs Burpee
90 secs Reverse crunch

30 secs rest

Round 2
Time
 

Exercise
30 secs Hacky sack, reach opposite hand to opposite foot
30 secs Fly Kick
60 secs Skaters balancing on one foot
60 secs Crunches with medicine ball
90 secs Foot taps on a medicine ball
90 secs Reverse crunch with medicine ball between knees.
60 secs Cardio Finisher 1: Skaters
60 secs Cardio Finisher 2: Plyo lunges

Finish the workout with a light jog followed by your own stretching session.

Let’s #GetHiitOn!